Thursday, October 19, 2023

Christmas in July card

Hello and I am so glad you stopped by to see how I made this super cute fun fold Christmas card that we made for my July Therapy Card Nite class.

In case you missed it, you can see how it is made.  We are using One Horse Open Sleigh DSP, which is so popular that it has sold out a few times but is now back in stock!!!  I am loving all the scenery pages that are in this pack.  Don't forget the other side that has designs too.  This card showcases the other side which is super awesome!

Here is it is when it is shut...


And when it is open you get to see the whole scene...


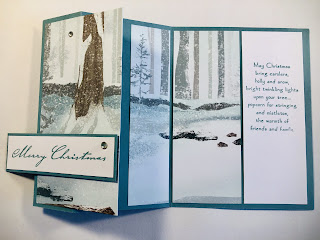
We use half a sheet of 8 1/2 X 11 cardstock.  We are using Lost Lagoon that is cut down to 5 1/2 X 8 1/2".  Then it is scored at 2 1/8" and then again at 4 1/4" and we Z fold it as shown below.


We take a sheet of 6X6 DSP and cut off  3/4" (here I cut it off the top to have more of the bottom scene) then we cut from left to right 2 3/4", 1 1/2" and then you are left with a 2 1/16' piece.


We also have a 1" X 5 1/2" coordinating piece of cardstock (something that matches a color in the DSP) that will go along the left side of the front of the card.  We also need a 2 X 5 1/4" of Basic White that we will use for the greeting on the inside of the card and then also cut 3 3/4" X 1" Basic White with a 4 X 1 1/4" Lost Lagoon layer for my sentiment.


Next is putting it all together.  Taking the 2 3/4" piece and attach it to the front flap leaving equal spacing along the edges.  Make sure you only tape/glue the flap.  As you see below you will have some hanging off.  Next add the 1 1/2" and space it along the folded edge of the middle of the card.  Then do the same on the other side of the folded edge with the 2 1/16" inch.  Next you will add the 2" greeting piece next to that.


I almost forgot the 1" piece of coordination cardstock that goes on the left front of the card.  As seen below.  I also stamped my greeting and layered that and added it to the front of the card.  Be sure that you only add tape/glue to the right side as to not have it stick to/attach to the left side of the card front so that it will open correctly.  Finally, I just added some jewels to the front to set it off!

Leave a comment and let me know what you think!


Tuesday, September 26, 2023

Chalkboard Technique 2

Here is the last post for "Back to School" Therapy Card Nite for August.  I brought back an old technique done a new or different way.  Instead of using Versa Mark and chalks, we just used Craft White on the black cardstock for this same type of look.  This card uses the Paint Texture BG Embossing folder and Real Red Cotton Ribbon along with some red gems.  I am showing this technique in 3 different layouts.  Which one is your favorite?


Wednesday, September 6, 2023

HB2U

YIKES!!!  Didn't realize how long it had been since I last posted.  Really am trying to be better about that.   I've got some ideas on things I would like to try with my blog, it's just a matter of time and how to.  So be sure to keep coming back!

This card is from Back 2 School Therapy Card Nite last month.  With that being said, all my Therapy Card Nites have a "theme" that usually goes with whatever is the next "holiday" mixed with a play on words.  My Back 2 School nite was a great play on words as we used techniques, colors, and the cards themselves to match.  Such as this card shown here.  We used the Large Alphabet & Letters Framelite Dies with your basic colors.  I would love to see your creations with this theme in mind.  Please feel free to share what you've made.   You can always check out my Stampin with Julia Facebook page for other cards I've made.


STAMPS: NONE
INKS: NONE
PAPERS: Pear Pizzaz, Real Red, Daffodil Delight, Balmy Blue, Flashback DSP (retired)
ACCESSORIES: Large Alphabet & Letters Framelite Dies, Mini Stampin' Cut & Emboss Machine, & Real Red Cotton Ribbon


Stampin' UP! Sept-Dec Mini Catalog is here...


Be sure to check out the new Mini Catalog!  There is a lot of great things in it!  One of my favorites is the Night Divine Bundle with the O Holy Night 12X12 DSP!   Not to mention the Autumn Leaves Bundle with the All About Autumn 6X6 DSP that I will be featuring in my upcoming Therapy Card Nite classes!  You do not want to miss out!!!  A few things have already sold out, but don't despair they will be back in stock soon!!!


Tuesday, July 25, 2023

Christmas Woods in July

We had Christmas in July Therapy Card Nite this month and this is the Christmas card that we made!  I got this fun fold layout idea from Lisa Freeman (sorry I don't remember who she credited).  I just thought these were so pretty and easy to make to boot!!!


We used a half a sheet of cardstock 5 1/2 x 8 1/2 and scored it at 4 1/4 & 1 1/2 inches.


Here are all the pieces that are needed to complete the card.  Base of card, I'm using Lost Lagoon, 5 1/2 x 8 1/2, DSP see below, inside message layer 1 7/8 x 5 1/4", extra side front strip 1 x 5 1/4 and lastly the greeting which for me ended up being 3 3/4 x 1" of white layered on 3 7/8 x 1 1/8" of Lost Lagoon.


Our One Horse Open Sleigh DSP (designer series paper) comes in 6 x 6 sheets.  You get 48 sheets total with 4 each of 12 designs.  For this card you need to cut your DSP down to 6 x 5 1/4".   Start by cutting off  3/4" (top piece) and then cut the rest down to (in order shown across) 2 3/4, 1 1/4, & 2".


Now all there is to do is assemble your card!  Be sure to only tape the first piece (the one with the brown tree trunk) to only the folded back flap on the front of the card so that you can open the card all the way.  See how the card looks when fully open.

 
I so enjoyed this card and so did the girls that when we do our Christmas Therapy Card Nite we will be using this fun fold again with other DSP from this paper pack.  

Hope you enjoyed this card.  Be sure to leave a comment and let me know what you think!!!

STAMPS: Season's Greetings
INKS: Lost Lagoon
PAPERS: Lost Lagoon, Basic White, One Horse Open Sleigh DSP
ACCESSORIES: Rhinestone Basic Jewels, Stampin' Dimensionals


Wednesday, June 21, 2023

Woodsy Kinda Card

Hey!  Sorry it's been a hot minute, but this month all of a sudden got very busy!  In a good way and it will probably be a few weeks before I have a chance to post again.  So this one will be kind of quick.

Here's some examples from one of the cards from It's A Guy Thing Card Nite last month.  The only one missing is the Father's Day sample as that went to my dad.  I didn't realize until now that I did not get a picture of it, but you get the jist of how it would have looked. The girls got their pick from either the Father's Day saying or the Happy Birthday saying.  I just made up the last 2 "thinking of you" cards from what was left over to have in my stash.    


I used the New Horizons DSP I had left over from last year. I really like how no 2 cards are alike when it comes to using this DSP.


I pulled out the Woodland embossing folder along with the Grove Dies and the Grassy Grove stamp set to create these cards.


Keep coming back to see some of the new DSP along with a fun fold.


STAMPS: Grassy Grove
INKS: Tuxedo Black Memento
PAPERS: Early Expresso, Sahara Sand, Garden Green, On the Horizons DSP
ACCESSORES: Grove Dies, Big Shot, Banner Triple Punch, Coluzzle (retired; used to cut circle)
 

Tuesday, May 23, 2023

Rose Wonder slim-line birthday card

Finally, I can post this GORGEOUS Rose Wonder slimline card that I made for my best friend, Becca, up in Iowa.  And yes, she loved it!

I used the same technique that I made the Mother's Day cards with that are on my Facebook page, Stampin' with Julia. (Be sure to go check it out and leave a comment) I have found that I am really loving the Blending Brushes to color with.  It works really well with outline stamps like the Rose Wonder set used here.

My slimline card measures 8 1/2" X 4", although you could do 9" X 4" and it will still fit a long envelope.  Unless of course you have an envelope maker where you can make any size card you'd like.  I stamped my rose image and then used the blender brushes to color them in.  I then stamped the saying and cut that out and used dimensional to "pop" it up off the card and topped it off with a few "gems".


STAMPS: Rose Wonder
INKS: Tuxedo Black Memento, Gorgeous Grape, Granny Apple Green
PAPERS: Basic White, Basic Black, Gorgeous Grape
ACCESSORIES: Rose Garden Thinlits Die, Big Shot, Seam Binding Ribbon, Purple Bling Stickers (gems) by Jolee's Boutique


Friday, April 14, 2023

Written in the stars...

Tomorrow is my 5-year anniversary and so I whipped up this card I've been thinking about for over a week now.   Our "main" song is "Written in the Stars" by Old Dominion, so I felt this card was very fitting to go with this anniversary.


I started with you Basic White card stock 4 X 5 1/4.  I punched out a circle with the 1" circle punch.  Got my blending brush and inks out along with stamping my main focal point out and coloring it with  Stampin' markers and Stampin' blends.


I started with the Balmy Blue and blended the color around where the moon would go.


I then started adding Pacific Point blending until I was happy with the color blend.  I then followed that up with Night of Navy and did the same thing until I got my desired look.


Afterwards I removed my circle that covered where my moon was going to be and I then added some Daffodil Delight to color the moon yellow.  I blended it out a bit into the sky so it looked like it was shining a bit.


As you can see here the moon is blended and I then took a white gel pen and added the stars.  If you look closely enough, I did put in a few constellations.  Can you find them?  I matted this on Night of Navy cardstock and added my focal point of the couple with some Stampin' Dimensionals

I did print out something to add to the inside, but I really like how this turned out.

Please leave a comment below and let me know what you think.


STAMPS: Embrace Each Moment
INKS: Night of Navy, Pacific Point, Balmy Blue, Tuxedo Black Memento, Stampin' Markers & Blends
PAPERS: Night of Navy & Basic White
ACCESSORIES: 1" Circle Punch, Blending Brushes, White Gel Pen, Stampin' Dimensials


Friday, April 7, 2023

Happy Easter

I want to wish everyone a very Happy and Blessed Easter weekend!!!

Love that spring and Easter coincide the way they do.  Everything that has been dead and dormant is now springing back to life along with the new babies that are born during this time!  This card is one we did for Springtime is Here Therapy Card Nite last month and it goes well with my little homestead!  I have recently got 2 baby ducks and just last week got 2 MORE baby chicks!!!

Even though this stamp set retired w/ the Mini Catalog last year I still love it and use it!!!  I did a mix with the duck and chickens.   I stamped the image in Daffodil Delight/Crushed Curry and then used the markers, Pumpkin Pie/Tangerine Tango to color the feet and beaks before stamping the images on paper.   I am also using the Dainty Flowers DSP from Sale-A- Bration.  Like I said in an earlier post I am trying to use my DSP because I am a paper hoarder...  I do think I am doing pretty good about using it up right now.  Although at times it makes me cringe a bit because I don't want to use it all up just in case...LOL

What's even more sad is that everything on this is retired or going to retire at the end of the month.  Yes, you see the Pear Pizzazz behind the stamped image...it is one of the many retiring colors for Stampin' Up! this year.  They do this every so often.  Thinking back I believe this is like the 4th one maybe they have done in 35 years?  This is not like the In Colors that are ONLY around for 2 years at a time, but this is a refresh of the color families themselves.  Here after I finally get all my ink pads updated....go figure!  Although I can say I really like some of the new and returning In Colors to the color families!


STAMPS: Easter Friends (retired)
INKS: Daffodil Delight, Crushed Curry, Pumpkin Pie, Tangerine Tango (retired), Black Pear Pizzazz (retiring this month)
PAPERS: Pear Pizzazz (retiring this month), Basic White, Dainty Flowers DSP
ACCESSORIES: Daffodil Delight Cotton Ribbon (retired)


Monday, March 27, 2023

Heartfelt Sympathy

Here is another super easy card I did with Springtime is Here Therapy Card Nite this month.  I did one like this years ago, but I really like how it looks and so I just changed the colors up a bit and then added the Heartfelt Sympathy sentiment from Close As a Memory.  I really like this in the Highland Heather purple.  This picture does not do the color justice.


STAMPS: Close As a Memory (retired), Thoughts & Prayers (retired)
INKS: Highland Heather Ink Pad/Marker, Garden Green Marker
PAPERS: Highland Heather, Basic Black, Basic White
ACCESSORIES: Tulip Edge Embossing Folder (retired), Big Shot


Tuesday, March 21, 2023

Dainty Hello

Hello...I have really fell in love with the Dainty Flowers DSP!  I wish that it would be in the regular or mini catalog instead of the Sale-A-Bration because we can no longer get it.  At least I got 4 packs earned before it was discontinued.  Which I will be using in some upcoming Therapy Card Nites.

I made this card for my bestie back in Iowa.  She is a former schoolteacher who is now a stay-at-home mom with 2 super cute kiddos.  That sadly, I have to watch grow up via FaceBook or FaceTime.  So that is one plus of FaceBook.

So her favorite color is purple and so I have tried to incorporate purple into the cards I have made her over the years.  This one is no different.  I thought she could use a bit of "HAPPY MAIL", so I made her this card with a few retired items.  


It's pretty similar to ones I've already made, just changed a few things up.  Like the "Hello" I used Whisper White ink and then added some Iridescent Ice embossing powder and heat set it.  I took a close up so that you could really see the "sparkle".   Loved how it came out.  I then punched it out with the label punch and took a blending brush and edged it up to make it stand out a bit more.  Not to mention put it on some Stampin Dimensionals!!!


STAMPS: Jar of Love (retired)
INKS: Whisper White & Highland Heather
PAPERS: Crushed Curry, Highland Heathe, & Dainty Flowers DSP (retired)
ACCESSORIES: Iridescent Ice Stampin' Emboss (retired), Blending Brush, Heat Tool, Label Punch (retired), Stampin' Dimensionals


Friday, March 17, 2023

Happy St Patty’s Day

 Hope you remember to wear your green today!!!  I went an ordered myself a "Kiss me I'm Iowish" shirt for today.  Seems fitting...LOL   We are having corned beef and cabbage w/ potatoes and carrots for dinner!!! YUM!!!  What is your favorite thing to eat for St. Patricks Day?

With that said, here is a card we made at last month's Therapy Card Nite!  I know this my look familiar to a few people as I have made this at one before YEARS ago, but I love this little leprechaun hat.  It's a super easy card and everyone loved it.  I know the ones who got this in the mail loved it too!!!


STAMPS: Teeny Tiny Words (retired)
INKS: Tuxedo Black Memento
PAPERS: Garden Green, Basic Black, Sahara Sand,  Crumb Cake, Whisper White
ACCESSORIES: Hearts Punch, Small Oval, Sponge, Crop-a-dile 

Wednesday, March 8, 2023

A Hunters 50th Birthday

So I have this terrific guy who LOVES to hunt, fish, ect...and he just celebrated his 50th birthday and so I had to make a fitting card just for him.  Now I did kind of case this look off of "Karilou" and just used similar things that I had.  I really liked the look of her card as you can tell, it looks kind of like a target.  Which of course is used a lot around here.  I stuck with pretty much the same color scheme other than instead of using just vellum I used a piece of Smokey Slate behind the vellum to help it stand out.  This makes a great guy card, if he is a hunter of course! 


PAPER: Crumb Cake, Very Vanilla, Smokey Slate, Basic Black, Vellum
STAMPS: From the Herd (retired)
INKS: Versa Mark
ACCESSORIES: Wood Grain Embossing Folder (retired), Swirly Scribbles Thinlits (retired), Forest Stag (from Poppy), Big Shot, Gold Embossing Powder, Heat Tool

Everything from Stampin' Up! unless otherwise noted.


Friday, February 24, 2023

Valentine Gnomes

Here are the Valentine cards I sent out to the family for Valentines this year.  I CASE'd (Copy And Share Everything) this layout from the mini catalog.  


I just changed a few things such as the layout, I went with landscape instead of portrait and used some old DPS.  (Still trying to use up my stash LOL...) 


 I do have to be honest though, I was not the biggest fan of the Gnomes at first, but THEY GREW ON ME!!!  I am so glad that I got the one from the mini with the dies and then this set.  I do hope they get some more.  They are super cute and there are a ton of ways to use them so come back and visit often!


STAMPS: Friendly Gnomes
PAPER: Daffodil Delight, Basic White, Print Poetry DSP (if anyone remembers those packs)
INKS: Tuxedo Black Memento, Pacific Point
ACCESSORIES: Watercolor Pencils & Blending Brush


Tuesday, February 21, 2023

VA Love

Hope everyone had a great Valentines Day.  I know the posts this week are a tad late for Valentine's Day, but I've had a busy week!  Not only Valentine Week, but I was also preparing for my bfs 50th birthday party and my son was able to come down also and it was his 28th birthday (their b-days are 3 days apart. It ended up being a double birthday bash!!!

For work we are encouraged to work volunteer hours throughout the year.   Well, it just so happens that one of the choices is to make cards for the VA in our area.  Since I love stamping and making cards this was a no brainer!  I make and send 20 of them for almost every signup they have.  It's a lot of fun for me and, like my email name says, I love to stamp to make someone smile!!!


This year I did the simple Heart Drop card using an OLD background stamp that is still one of my favorites.  I paired it with a newer but retired last years Sale-a-bration stamp saying.


STAMPS: Soft Swirls, Counting Sheep (last years Sale-a-bration set)
PAPER: Real Red, Basic White
INKS: Versa Mark, Real Red
ACCESSORIES: Heart Punch


Friday, February 3, 2023

Dainty Flowers

Ok, so I didn't buy this paper I earned it for FREE!!!  It's SALE-a-bration time for Stampin' Up! which means for every $50 spent you get to pick a free item from the SALE-a-bration catalog.  There's stamp sets and paper which all coordinates with items in the Mini Catalog and the Yearly Catalog.  So now is a great time to check things out if you are curious.


I'm not the BIGGEST flower fan when it comes to DSP, but this paper was pretty AND the flip side is more softer and not all flowers.  That is one of the things with Stampin' Up!, is that all their paper is printed on both sides!!!  Sometimes it is hard to choose.  This paper is 12 X 12 and I was able to cut it down to make these cards.  This is just half of a sheet for all 4 cards!!!


One of the great things with these cards is that you can use any saying you want so you have any type of card that you need right at your fingertips!!!


These cards I made to give to my mom as she loves to mail cards to her grandkids and friends.  I even get one mailed to me!!! LOL


Friday, January 27, 2023

So Much Love


Loving this card that I CASED from the mini catalog with a few alterations.  Like the DSP in the background.  I couldn't tell how old that paper is...all I know is that is from the Candy Lane collection.  Yes, I am a paper hoarder and I still have some paper from 2002.  I do try to use it up, but it so pretty and what if I need it for a special card???  Like this!!!  I am trying not to buy too much paper right now so that I will use what I have.  I forgot when I packed up to move how much paper I had.  I got rid of a bunch of it, but it seems like I still have a lot left.  Now that I am back to making cards, I will hopefully start using it up more.  

I made this card using the Love For You stamp set and dies.  This set has so many sentiments that I know I will use for a long time to come.  Secretly I hope this makes it into the yearly catalog...fingers crossed.

Friday, January 13, 2023

A little peek...


Though the title was fitting for this little gnome peeking out of the tree trunk.   This card features the Kindest Gnomes (that just retired last week, but don't let that get you down as there is a new one available) along with the Gnomes Die set, and the Tree Rings Die and Embossing Folder.  CASE'd this idea from Rachel Tessman and added the inside tree rings and the little berries and leaves to top mine off.

Monday, January 9, 2023

It's been a while...

 Well, life has had a few surprises over the past few years and I took a break from stamping for a while, but...I am back!  May be a hit and miss as I get back into the groove of things again, but I will try my best to start posting on a regular bases.  Not sure what that will be to start off with weekly, bi-weekly or monthly, but this is a start.  Never mind what it took to get back into this blog to restart posting again, it's been a journey in itself!  LOL  

Wait till you see all the cool stamp sets that have come out along with new techniques!!!  I can't tell you how much I've missed playing with paper and ink!  I do have to relearn how to upload pictures on here again, but hopefully it won't take long to figure out...should be like riding a bike right?  Let's hope so...

Check back in soon to see what I've been working on for my own personal fun time and my new classes that are starting up later this month...