Love the Sale-A-Bration this year!!! I love DSP and especially with Stampin' Up!'s as it is double-sided, and all the packs coordinate so well. As you are making your wish lists from the Annual Catalog and the Mini along with the Sale-A-Bration freebies do not overlook the On-Line Exclusives!!! The Hello, Irresistible 6X6 DSP is beautiful paper that features Lost Lagoon, which is a new main line color, that I used with this card. This DSP also coordinates with a stamp set and die cut that is also part of the On-Line Exclusive items. So be sure to check them out also when you're making you wish list to get your FREEBIES from Sale-A-Bration!!!
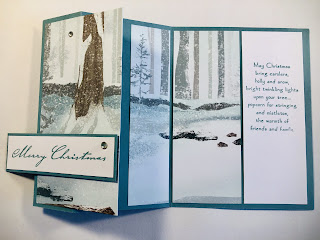
I got the idea for this card below, from Rhonda. I used the Hello Irresistible DSP just a different design, as there are so many pretty designs in this pack. I decided to use the Lost Lagoon as my base for this "Envelope Fold" fun fold card. I brought in a sentiment from the Sending Smiles stamp set that went perfect with this card I think. I do not yet have the Irresistible Blooms Die Set so I used scissors to cut out the flower on the front.
There were a few different color combos that could be use with this DSP it was hard to pick one. Tell me, what color would you have use?


STAMPS: Sending Smiles
INKS: Lost Lagoon
PAPERS: Lost Lagoon, Daffodill Delight, Basic White, Hello Irresistible DSP
ACCESSORIES: Sending Dies, Starburst Framelit Dies (retired), & Stamp & Emboss Machine, Scissors